To Friends and Family:
Just the mention of “Barbecue” conjures up a plethora of emotions, feelings, tastes, smells and the word can be used in many forms.
For most, the general term means a celebration of family, friends, food, fun and is uniquely American as apple pie, baseball and the 4th of July.
In fact, throughout American history, going back to the birth of our nation, barbeques have been used to commemorate special events, political gatherings, holidays and other festivities where folks get together to enjoy life, liberty and the American way of cooking outdoors.
And while I love as much as anybody the whole concept of getting outside, firing up the grill and enjoying all the things I’ve mentioned above, I’m not here to talk about celebrations, grilling meats or even recipes. What I’m going to do for you today is disobey the unspoken rule of “Real Honest-To-Goodness-Barbecue” and reveal the mysteries I have learned from a lifetime of studying, searching, tasting and years of trial and error searching for the secrets of real “Bar-B-Q.”
I remember very distinctly the moment I tasted my first authentic smoked ribs or “Q” for short. I was in North Carolina on a radio assignment when, at a dinner party, I bit into what, at first glance, looked like an unassuming pork rib with no accouterments whatsoever. In an instant my taste buds were flooded with a cacophony of sensations that can only be described as heaven on earth. I was blown away. It was an explosion of taste I had never experienced before, a perfect blend of smoky, tangy, sweetness that overwhelmed me and I have spent the rest of my days searching for the secret of that first encounter with culinary enlightenment.
Perfection is a subjective term, but what I have learned from my journey is this, real barbecue is not about the type of meat you use, the sauce or the regional flavors. It’s not a recipe, or the spices you add, or something you can learn out of a book. It is a process and that process is time honored, sacrosanct, and must be followed. There are no shortcuts. Many an old-timer has cautioned me that: “I would ruin a lot of pork, beef and chicken before I learned the how and why of smoking meat slow and low over smoldering wood.” But, over the years, as I have persistently studied, learned, experimented and yes, ruined a lot of meat, I think in my quest for knowledge and discovery, the results I’ve achieved are much closer to that work of art I experienced so many years ago.
The following are the secrets and mysteries I have learned of the barbecue process and are my gift to all of you.
1. Equipment
Smoker 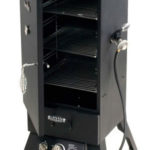 The most important and necessary piece of equipment, if you are going to produce real barbeque, is a smoker. Your backyard grill will not suffice. You must be able to control the temperature, moisture, circulation and smoke if you are to get the results you want. Amazon has a great selection and Costco has them on sale every spring. Buying one is not as farfetched or as expensive as you think. They double as a great outdoor oven and food warmer for your patio. Plus, if you get gas you will have a spare tank for your grill when you run out in the middle of cooking steaks or vice-versa.
Commercial Serving Pans At least two full size pans are essential to hold the meat as you apply the rub, marinate, transport and store your product. The process can get messy. If you do not want to purchase industrial pans, disposal aluminum pans will work. Just make sure they are large and strong enough to hold the product.
Aluminum Foil Industrial strength, x-large roll. You do not want to run out in the middle of the process.
Wood I’m partial to Hickory. It burns evenly and provides a dense smoke. Be careful that you purchase untreated wood. The chemicals in treated wood leave a nasty taste and residue. Hickory does induce a slightly bitter taste, so I balance it with sweet fruitwood like cherry or apple. I am fortunate that we had a cherry tree on our property that I cut down and saved the branches. I use a 50/50 blend of Hickory and Cherry.
Paper Towels-The process can get messy
Large Garbage Can W/Lid-To hold the mess
Long Handled Barbeque Brush-To apply the Sauce
Rubber Gloves-To protect yourself and the product
Work Table-Large enough to hold your trays and product
Sharp Knife-To trim and portion control product
2. Meat
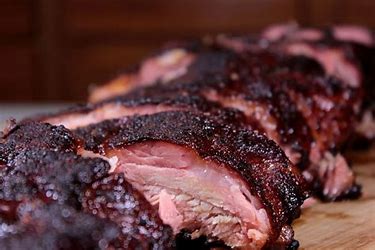
While technically you can smoke anything you might imagine and get good results, I have found the traditional choices like ribs, brisket, or skin-on chicken thighs are the best meats to smoke. The process is the same. The smoking time might vary but not much. This recipe is about ribs, the gold standard for anyone ascribing to be a Pit Master, and, ultimately, how your barbecue skills will be judged.
Ribs-St. Louis cut. They are meatier, larger and more uniform than back ribs. If you watch the ads you can find them on sale. Buy them on sale and freeze them until you have the time to complete the process. Think of it as you would your food storage. The time to properly complete the process will take a minimum of 2 days so plan accordingly. Remember, there are no shortcuts. My smoker, which I bought at Costco, holds six slabs so I buy and prepare that many at a time.
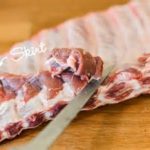 When everything is ready, place the raw slab of ribs on your work table rib side up, straight edge on top. The ribs will get shorter as you work left to right. Slabs will average 8-10 ribs. There will be an overlapping flap on the long side. Trim, prepare and cook these smaller pieces of meat along with your ribs. These will be your samples along the way to taste and enjoy. Remove the thin skin-like membrane from the back of the ribs. Starting at the right, uppermost corner of the slab, at the shortest rib, with a sharp knife, peel the membrane away from the rib until you have a large enough piece to grab firmly. Carefully pull the membrane across the entire slab. If it breaks or tears, start over. Removing the membrane allows the rub to infiltrate the back portion of the ribs.
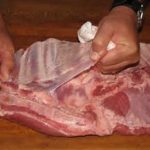 Repeat process for each slab. When finished pulling the membrane off, cut each slab in half. A full rack will not fit comfortably in the smoker and cutting them in half gives you a uniform portion to work with throughout the process. Stack the ribs in your serving tray.
3. Rub
Prepare your rub in advance. I always make enough at the start of the year to last the season. It stores well and is nice to have on hand. Here is my recipe I have developed over the years. Like all Pit Masters, I believe it combines all the essential components and flavors you need for mouthwatering, knock-them-dead barbeque.
The easiest way to purchase each of these ingredients is at the dollar store. One cup equals one of those little ubiquitous bottles you have in your cupboard and you can buy each of them for a dollar. For less than $10.00 you will have enough rub to last the season.
1 Cup each:
Onion Powder
Garlic Powder
Brown Sugar
Sea Salt
Cayenne Pepper
Cumin
Dried Parsley
Cinnamon
Paprika
Mix all the ingredients together in a large bowl. Keep away from your eyes and wear gloves if you use your hands. When all the ingre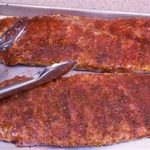 dients are mixed, either store in an air-tight container or set aside to use when you’re ready to start applying the rub. Begin by placing a half slab, rib side down in your serving pan. With a scoop or small bowl sprinkle your rub liberally on the meat. With gloved hands, spread the rub evenly and press into the meat. Repeat on the other side. Shake off the excess run and place the rub covered slab in a serving pan and repeat the process with the other slabs. When finished applying the rub dispose of the used leftover rub in the pan. What rub you did not use, store in an air-tight container. You will be glad you did.
4. Marinate
On your worktable spread out a large piece of aluminum foil. Place a half slab, meat side down, in the middle of the foil. Fold the foil over the ribs on each side and seal the foil. Turn over and repeat the process. Make sure you have a good seal. The salt in the rub will draw out the moisture and the packages will leak if they are not tight. Repeat with the other slabs. Place your wrapped packages in the serving trays and refrigerate for at least twelve hours. If your refrigerator does not have room, place the trays in a large cooler and add some ice on top. Make sure the packages stay cool.
5. Sauce
While the meat is marinating, prepare your sauce. Take your time. The rub is the layer that is embedded in the meat during the smoking proces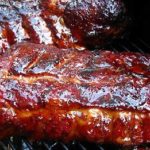 s. The sauce is the golden glaze on the finished product and the first impression folks will see in the final presentation. I like to think of it this way. The meat is the canvas. The rub is the background of the portrait and the sauce is the finish that supplies the detail to your art. Each layer adds to the complexity of the finished product so when you take that first bite the flavors all cascade together in an avalanche of taste and texture. Each nibble is a singular masterpiece to be savored and appreciated. The sauce can be prepared in advance although I like to make it fresh for each batch of ribs, chicken or brisket because, just like a work or art, each batch will differ in its subtlety, flavor and texture.
In a large sauce pan, melt one stick of butter over medium heat.
Add: 1 Diced Onion
2 Cloves of Chopped Garlic
1 Diced Large Green Pepper
1 Diced Jalapeno Pepper
½ Cup Dried Parsley
Sauté the ingredients until the onion turns translucent, about 6-8 minutes.
Add:1 Cup Brown Sugar.
1 Cup Vinegar
2 Cans Tomato Sauce
1 Cup Sherry or Red Wine
1 Cup Molasses
1 Tbsp. Dried Mustard Powder
Dash of Liquid Smoke
Stir until dissolved and the sauce thickens and darkens. Thin with water if needed. Cool and store until ready to use.
6. Prepare the smoker
Hopefully you remembered to clean and wipe it down after your last use. If not, remove the racks, water tray, and wood box and clean thoroughly. Replace the racks, fill the water tray and the wood box with your mixture of Hickory and Cherry Wood. Start the fire and monitor the temperature until you can maintain a constant temperature of 210-220 degrees Fahrenheit. Depending on the wind and outside temperature you might have to adjust the flame and vents until you can maintain the desired setting. Remove the marinated ribs from the refrigerator or cooler and place them on a work bench close to the smoker. Place a garbage can close by. Carefully remove the tin foil from each package and dispose in your garbage can. Be careful, it will be messy. Paper towels are a necessity. Be sure to cover the garbage can after you throw your used tin foil away. All that sweetness and goodness will attract all kinds of outdoor activity, especially bees and hornets. Place your prepared slabs on the racks rib side down. The temperature will drop so monitor the flame until you reach 210-220 degrees. Adjust the vents on the smoker depending on the wind until the smoke released is constant. Smoke the meat untouched for two hours while you maintain the desired temperature.
7. Baste 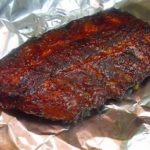
After two hours of smoking the wood will have burned out. On a work bench assemble the following: Tin foil, a large jar of course un-sweetened apple sauce and a jar of honey. On your worktable spread out a large piece of aluminum foil. Remove and place a half slab, bone side down in the middle of the foil. Pour a liberal stream of honey down the middle of the smoked rib portion. Add approximately one-cup of apple sauce until it covers the meat and spread the mixture of honey and apple sauce evenly across the ribs. Re-wrap the portion in foil and seal. Continue until you have applied the baste to each slab and replace the slabs in the smoker. The temperature will have dropped so monitor the flame until you again reach 210-220 degrees. Leave untouched for one hour.
8. Freeze
After three hours remove your rib packages from the smoker, place them on your work bench or table and turn off the flame to the smoker. It has done its job. Carefully remove the tin foil from each package. Be careful, it will be messy. Paper towels are a necessity. On your worktable spread out a new piece of aluminum foil. Carefully scrape and shake the applesauce and honey mixture off each rib portion and place a half slab, bone side down in the middle of the foil. Re-wrap the portion in foil and seal. Freeze until needed. 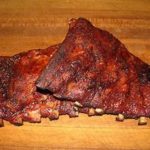 Freezing stabilizes the meat and shrinks it towards the middle of the bone. You now have twelve individually wrapped and portioned rib masterpieces waiting for your next barbeque. All they need are the finishing touches.
9. Thaw and Grill
Twenty-four hours before your event, remove and thaw the desired number of packages. Allow one package for each guest or family member. Approximately 4-6 ribs per person. Fire up your grill until it reaches a constant temperature of 450 degrees or hot on the dial. Place your rib portions meat side down until the meat begins to caramelize, approximately 6-8 minutes. Turn ribs and adjust the heat down, your cooking is done.
10. Mop
With a brush or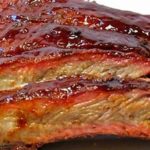 barbeque mop apply your sauce evenly over the meat portion of the rib. Close lid and allow the sauce to glaze, approximately 8-10 minutes. Very carefully turn the meat side back to the grill and baste the rib side. Do not leave the meat side down on the grill for more than a few minutes. The sugars in the sauce will burn if exposed to high heat. This is important, so please be careful and don’t burn what you have spent so much time and energy on. The ribs are now done. Using a sharp knife and the meat side down, slice each rib individually and serve. If you have followed the process, each rib will present a uniquely perfect picture of taste, smell and flavor.
11. Exceptions
If you plan on preparing and serving your ribs the day you smoke them, or, if you have prepared brisket, roasts or chicken, you will bypass the baste and freeze portions of this process. Brisket and roasts will take approximately one hour per pound to finish the cooking process while chicken should be done after the initial two hours of smoke. Do not baste your ribs in tin foil with the honey/applesauce mix if you are planning on serving them immediately. Basting softens the bitterness of the smoke and supplies the fall-off-the-bone tenderness. If you serve your ribs immediately after the basting process or try to grill them, they will be too tender and will fall apart. Freezing is what stabilizes the meat yet still retains the tenderness. But, and this is important, if you are planning on serving your ribs immediately, or intend on grilling them, you must mop with your prepared sauce every fifteen minutes during the last hour of the cooking process. This will replace the moisture lost during the smoking procedure. The same goes for Brisket, Pork Roasts and Chicken. Mop liberally during the last hour of cooking. If you have maintained the temperature at 210-220 degrees, the sauce will not burn. It will keep the meat moist and provide a heavenly glaze to your finished product.
We talked earlier about the barbeque process and how each step is necessary if you are to obtain authentic, “Real Honest-To-Goodness-Barbecue.” 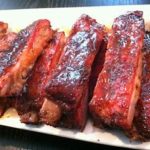 After years of trial and error, I fundamentally believe, not only in the sanctity of the process, but distraction from any of these steps will diminish the final product. A product which, in my estimation, will be a much greater work of art than any average or run-of-the-mill painting or sculpture. After searching for the truth and finally reaching the mountaintop and knowing what real barbeque is, you will absolutely be able to taste and know the difference. Maybe your guests will not, and they might rave about how good your product is, and heap all kinds of praise on your cooking prowess because they don’t know what real barbeque is. But you will know and I guarantee you, if you skip a step, or skimp on the ingredients, or don’t take the time, you will feel guilty that you cheated yourself out of, what could and should have been, a work of wonder, excellence and gastronomic perfection.
Enjoy!
Millcreek, Utah
December 2017